 建立第一支Laravel CRUD應用程式
# Implement a Laravel 8 CRUD Application
Laravel 8是我第一個使用的PHP Framework,因為我之前都是寫ASP.NET 😅 底下就是一個使用Laravel 8,建立一個CRUD的應用。
# Step 1:建立Laravel 8專案
首先,透過composer的指令先把我們的Laravel 8 專案建起來,專案名稱就先命名blog
composer create-project --prefer-dist laravel/laravel blog
# Step 2:設定資料庫MySQL的資料
在專案的根目錄下,找到 .env 檔,並將資料庫名稱及存取資料庫的帳號密碼設定好 我是採用mysql做示範,
.env
DB_CONNECTION=mysql
DB_HOST=127.0.0.1
DB_PORT=3306
DB_DATABASE=laravel_blog
DB_USERNAME=root
DB_PASSWORD=
2
3
4
5
6
# Step 3:Create Migration
第三步我們要透過php artisan make:migration指令來定義products資料表,指令如下
php artisan make:migration create_products_table --create=products
接著我們會在 database/migrations 這個目錄,看到剛剛下指令所產生的2021_05_11_073210_create_products_table.php 然後我們加入name跟detail二欄分別為string和text,
    public function up()
    {
        Schema::create('products', function (Blueprint $table) {
            $table->id();
            $table->string('name'); //新增name欄位
            $table->text('detail'); //新增detail欄位
            $table->timestamps();
        });
    }
2
3
4
5
6
7
8
9
最後執再到command line上執行 php artisan migrate,Laravel就會幫你在mysql資料庫中建立好剛剛定義的products table
php artisan migrate
如果你是第一次在Laravel專案中執行 php artisan migrate時,遇到一個錯誤訊息 Syntax error or access violation: 1071 Specified key was too long; max key length is 767 bytes 這時就需要在/app/Providers/AppServiceProvider.php 這支php內容中增加一段 Schema::defaultStringLength(191);
<?php

namespace App\Providers;

use Illuminate\Support\ServiceProvider;
use Illuminate\Support\Facades\Schema; //新增

class AppServiceProvider extends ServiceProvider
{
   /**
    * Register any application services.
    *
    * @return void
    */
   public function register()
   {
       //
   }

   /**
    * Bootstrap any application services.
    *
    * @return void
    */
   public function boot()
   {
       Schema::defaultStringLength(191); //新增
   }
}
1
2
3
4
5
6
7
8
9
10
11
12
13
14
15
16
17
18
19
20
21
22
23
24
25
26
27
28
29
如果沒有意外的話,就會看到console會有下列幾個完成table建立的訊息
PS D:\Projects\Laravel\blog> php artisan migrate
Migrating: 2014_10_12_000000_create_users_table
Migrated:  2014_10_12_000000_create_users_table (39.06ms)
Migrating: 2014_10_12_100000_create_password_resets_table
Migrated:  2014_10_12_100000_create_password_resets_table (29.71ms)
Migrating: 2019_08_19_000000_create_failed_jobs_table
Migrated:  2019_08_19_000000_create_failed_jobs_table (27.84ms)
Migrating: 2021_05_11_073210_create_products_table
Migrated:  2021_05_11_073210_create_products_table (13.67ms)
2
3
4
5
6
7
8
9
# Step 4:新增Resource Route
在routes/web.php中,我們要增加products的路由 routes/web.php
use App\Http\Controllers\ProductController;

Route::resource('products', ProductController::class);
2
3
# Step 5:新增 Controller and Model
在這個步驟中我們要透過php artisan指令來產生ProductController,並同時建立Product Model
php artisan make:controller ProductController --resource --model=Product
執行完後會在console中看到完成Model和Controller的訊息
Model created successfully.
Controller created successfully.
2
接著我們在app/Http/Controllers/ProductController.php這支新增的ProductController去撰寫我們要的這7個methods
    public function index()
    {
        $products = Product::latest()->paginate(5);

        return view('index',compact('products'))
            ->with('i', (request()->input('page', 1) - 1) * 5);
    }

    public function create()
    {
        return view('create');
    }

    public function store(Request $request)
    {
        $request->validate([
            'name' => 'required',
            'detail' => 'required',
        ]);

        Product::create($request->all());

        return redirect()->route('products.index')
                        ->with('success','Product created successfully.');
    }

    public function show(Product $product)
    {
        return view('show',compact('product'));
    }

    public function edit(Product $product)
    {
        return view('edit',compact('product'));
    }


    public function update(Request $request, Product $product)
    {
        $request->validate([
            'name' => 'required',
            'detail' => 'required',
        ]);

        $product->update($request->all());

        return redirect()->route('products.index')
                        ->with('success','Product updated successfully');
    }

    public function destroy(Product $product)
    {
        $product->delete();

        return redirect()->route('products.index')
                        ->with('success','Product deleted successfully');
    }
2
3
4
5
6
7
8
9
10
11
12
13
14
15
16
17
18
19
20
21
22
23
24
25
26
27
28
29
30
31
32
33
34
35
36
37
38
39
40
41
42
43
44
45
46
47
48
49
50
51
52
53
54
55
56
57
然後再來我們要在Product Model中加入
app/Models/Product.php
class Product extends Model
{
    use HasFactory;

    protected $fillable = [
        'name', 'detail'
    ];
}
2
3
4
5
6
7
8
# Step 6: 新增Blade Files
在最後我們要在Laravel加入blade頁面,提供使用者的操作頁面
- layout.blade.php
- index.blade.php
- create.blade.php
- edit.blade.php
- show.blade.php
resources/views/products/layout.blade.php
<!DOCTYPE html>
<html>
<head>
    <title>Laravel 8 CRUD Application</title>
    <link href="https://cdnjs.cloudflare.com/ajax/libs/twitter-bootstrap/4.0.0-alpha/css/bootstrap.css" rel="stylesheet">
</head>
<body>

<div class="container">
    @yield('content')
</div>

</body>
</html>
2
3
4
5
6
7
8
9
10
11
12
13
14
15
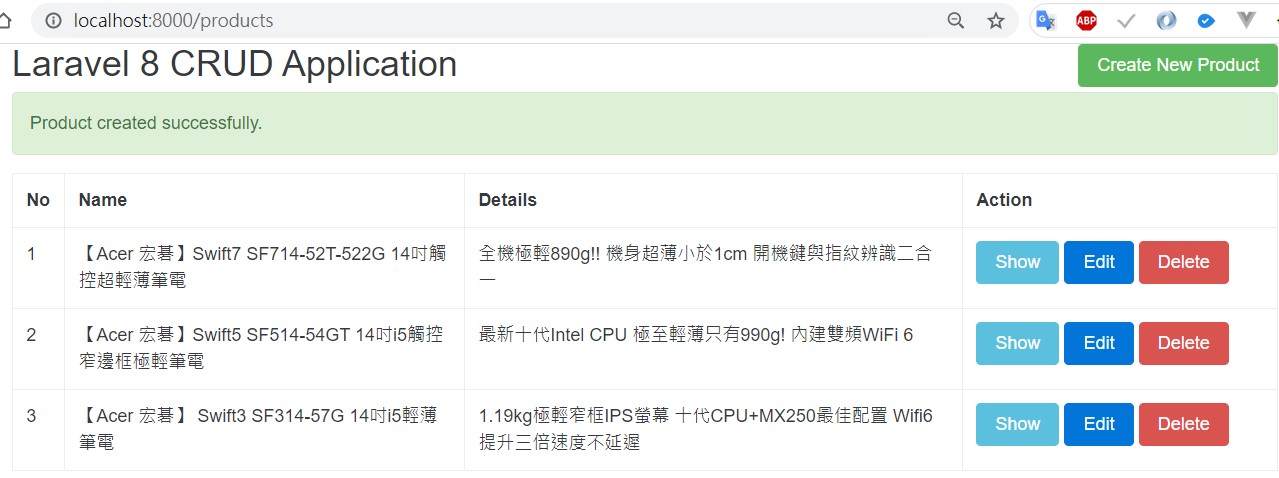
resources/views/products/index.blade.php
@extends('layout')

@section('content')
    <div class="row">
        <div class="col-lg-12 margin-tb">
            <div class="pull-left">
                <h2>Laravel 8 CRUD Application</h2>
            </div>
            <div class="pull-right">
                <a class="btn btn-success" href="{{ route('products.create') }}"> Create New Product</a>
            </div>
        </div>
    </div>

    @if ($message = Session::get('success'))
        <div class="alert alert-success">
            <p>{{ $message }}</p>
        </div>
    @endif

    <table class="table table-bordered">
        <tr>
            <th>No</th>
            <th>Name</th>
            <th>Details</th>
            <th width="280px">Action</th>
        </tr>
        @foreach ($products as $product)
        <tr>
            <td>{{ ++$i }}</td>
            <td>{{ $product->name }}</td>
            <td>{{ $product->detail }}</td>
            <td>
                <form action="{{ route('products.destroy',$product->id) }}" method="POST">

                    <a class="btn btn-info" href="{{ route('products.show',$product->id) }}">Show</a>

                    <a class="btn btn-primary" href="{{ route('products.edit',$product->id) }}">Edit</a>

                    @csrf
                    @method('DELETE')

                    <button type="submit" class="btn btn-danger">Delete</button>
                </form>
            </td>
        </tr>
        @endforeach
    </table>

    {!! $products->links() !!}

@endsection
2
3
4
5
6
7
8
9
10
11
12
13
14
15
16
17
18
19
20
21
22
23
24
25
26
27
28
29
30
31
32
33
34
35
36
37
38
39
40
41
42
43
44
45
46
47
48
49
50
51
52
53
resources/views/products/create.blade.php
@extends('layout')

@section('content')
<div class="row">
    <div class="col-lg-12 margin-tb">
        <div class="pull-left">
            <h2>Add New Product</h2>
        </div>
        <div class="pull-right">
            <a class="btn btn-primary" href="{{ route('products.index') }}"> Back</a>
        </div>
    </div>
</div>

@if ($errors->any())
    <div class="alert alert-danger">
        <strong>Whoops!</strong> There were some problems with your input.<br><br>
        <ul>
            @foreach ($errors->all() as $error)
                <li>{{ $error }}</li>
            @endforeach
        </ul>
    </div>
@endif

<form action="{{ route('products.store') }}" method="POST">
    @csrf

     <div class="row">
        <div class="col-xs-12 col-sm-12 col-md-12">
            <div class="form-group">
                <strong>Name:</strong>
                <input type="text" name="name" class="form-control" placeholder="Name">
            </div>
        </div>
        <div class="col-xs-12 col-sm-12 col-md-12">
            <div class="form-group">
                <strong>Detail:</strong>
                <textarea class="form-control" style="height:150px" name="detail" placeholder="Detail"></textarea>
            </div>
        </div>
        <div class="col-xs-12 col-sm-12 col-md-12 text-center">
                <button type="submit" class="btn btn-primary">Submit</button>
        </div>
    </div>

</form>
@endsection
2
3
4
5
6
7
8
9
10
11
12
13
14
15
16
17
18
19
20
21
22
23
24
25
26
27
28
29
30
31
32
33
34
35
36
37
38
39
40
41
42
43
44
45
46
47
48
49
resources/views/products/edit.blade.php
@extends('layout')

@section('content')
    <div class="row">
        <div class="col-lg-12 margin-tb">
            <div class="pull-left">
                <h2>Edit Product</h2>
            </div>
            <div class="pull-right">
                <a class="btn btn-primary" href="{{ route('products.index') }}"> Back</a>
            </div>
        </div>
    </div>

    @if ($errors->any())
        <div class="alert alert-danger">
            <strong>Whoops!</strong> There were some problems with your input.<br><br>
            <ul>
                @foreach ($errors->all() as $error)
                    <li>{{ $error }}</li>
                @endforeach
            </ul>
        </div>
    @endif

    <form action="{{ route('products.update',$product->id) }}" method="POST">
        @csrf
        @method('PUT')

         <div class="row">
            <div class="col-xs-12 col-sm-12 col-md-12">
                <div class="form-group">
                    <strong>Name:</strong>
                    <input type="text" name="name" value="{{ $product->name }}" class="form-control" placeholder="Name">
                </div>
            </div>
            <div class="col-xs-12 col-sm-12 col-md-12">
                <div class="form-group">
                    <strong>Detail:</strong>
                    <textarea class="form-control" style="height:150px" name="detail" placeholder="Detail">{{ $product->detail }}</textarea>
                </div>
            </div>
            <div class="col-xs-12 col-sm-12 col-md-12 text-center">
              <button type="submit" class="btn btn-primary">Submit</button>
            </div>
        </div>

    </form>
@endsection
2
3
4
5
6
7
8
9
10
11
12
13
14
15
16
17
18
19
20
21
22
23
24
25
26
27
28
29
30
31
32
33
34
35
36
37
38
39
40
41
42
43
44
45
46
47
48
49
50
resources/views/products/show.blade.php
@extends('layout')

@section('content')
    <div class="row">
        <div class="col-lg-12 margin-tb">
            <div class="pull-left">
                <h2> Show Product</h2>
            </div>
            <div class="pull-right">
                <a class="btn btn-primary" href="{{ route('products.index') }}"> Back</a>
            </div>
        </div>
    </div>

    <div class="row">
        <div class="col-xs-12 col-sm-12 col-md-12">
            <div class="form-group">
                <strong>Name:</strong>
                {{ $product->name }}
            </div>
        </div>
        <div class="col-xs-12 col-sm-12 col-md-12">
            <div class="form-group">
                <strong>Details:</strong>
                {{ $product->detail }}
            </div>
        </div>
    </div>
@endsection
2
3
4
5
6
7
8
9
10
11
12
13
14
15
16
17
18
19
20
21
22
23
24
25
26
27
28
29
30
# 啟動網頁服務
php artisan serve
# 在瀏覽器開啟CRUD App
http://localhost:8000/products